
✨ This article was AI edited. Editorial responsibility: 3D-P.eu.
Produced with AI. This article was artificially generated. Editorial responsibility: 3D-P.eu.
The Weedo / Entina Tina 2 has gained widespread popularity as an affordable, plug-and-play desktop 3D printer for educators, students, and hobbyists. However, because the Tina 2 features a compact Bowden extruder paired with an unheated magnetic build plate, printing with incorrect hotend temperatures frequently leads to severe underextrusion, clicking extruder gears, or parts detaching mid-print.
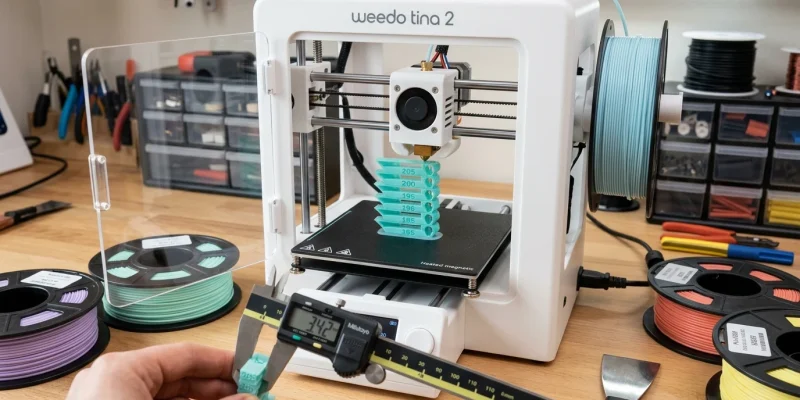
Running a systematic nozzle temperature calibration test is the single most effective way to eliminate print defects on your Tina 2. In this in-depth guide, we walk through slicing a custom temperature tower, interpreting thermal test results, and tuning slicer profiles in Wiibuilder, Cura, or PrusaSlicer.
Why the Tina 2 Requires Precise Temperature Tuning
Unlike larger open-frame printers with all-metal hotends and 100W heated beds, the Tina 2 operates under specific mechanical constraints:
- PTFE-Lined Heatbreak: The stock Tina 2 hotend uses a PTFE guide tube running directly to the nozzle tip. Exceeding 230?C can degrade the PTFE liner, producing toxic off-gassing and permanent throat blockages.
- Unheated Bed Adhesion: Because the magnetic spring steel bed lacks heating elements, first-layer adhesion depends heavily on the thermal energy of the extruded plastic molten bead fusing to the textured build sticker.
- Compact Part Cooling Fan: The 3010 blower fan has modest airflow; excessive hotend temperatures quickly cause heat creep up the cooling fins, resulting in cold-end filament swelling.
| Filament Type | Recommended Test Range | Optimal Tina 2 Sweet Spot | Key Thermal Failure Mode |
|---|---|---|---|
| Standard PLA | 185?C ? 215?C | 195?C ? 200?C | Stringing >205?C; extruder clicking <190?C |
| Silk / High-Speed PLA | 195?C ? 225?C | 205?C ? 210?C | Dull finish if too cold; severe oozing if too hot |
| PLA+ / Tough PLA | 205?C ? 225?C | 215?C ? 220?C | Brittle layer separation if printed below 210?C |
| Low-Temp TPU (95A) | 200?C ? 220?C | 205?C ? 210?C | Bowden tube jam if backpressure exceeds threshold |
How to Slice a Temperature Tower for the Tina 2
While you can use the proprietary Wiibuilder slicer, setting up temperature changes in UltiMaker Cura provides far greater precision.
Step 1: Download a Standard PLA Temp Tower STL
Download a 220?C to 180?C calibration tower with 5?C stepping increments per tier (typically 10 mm height per block with overhang bridges and stringing cones).
Step 2: Add Post-Processing Scripts in Cura
- Open Cura with your Tina 2 printer profile loaded.
- Navigate to the top menu: Extensions > Post Processing > Modify G-Code.
- Click Add a script and select ChangeAtZ or TempFanTower.
- Set the trigger to Target Layer or Height. For a tower starting at 220?C with 10 mm steps:
- Layer 1 ? 50 (0 to 10mm): Base + 220?C
- Layer 51 (10mm): Set Target Temp to 215?C
- Layer 101 (20mm): Set Target Temp to 210?C
- Layer 151 (30mm): Set Target Temp to 205?C
- Layer 201 (40mm): Set Target Temp to 200?C
- Layer 251 (50mm): Set Target Temp to 195?C
- Slice and save the G-code directly to your micro-SD card.
Evaluating Your Tina 2 Temperature Test Results
Once printed, inspect the tower under bright raking light across four key criteria:
- Overhang Droop & Bridging: Look at the 45? overhangs and horizontal bridges. The tier with the flattest, tightest bridging without sagging shows where cooling and melt viscosity are perfectly balanced.
- Stringing & Oozing: Examine the needle cones. Higher temperatures cause filament to droop and cobweb across travel paths. Lower temperatures create cleaner retracts.
- Layer Adhesion / Delamination: Test the mechanical strength by trying to snap the tower with your fingers. Tiers printed too cold will shear effortlessly along layer lines.
- Surface Gloss & Detail: Consistent color saturation and crisp corner definition denote thermal equilibrium.
Comprehensive Slicer Profile Specifications for Tina 2
To achieve repeatable dimensional accuracy and surface quality across different materials on the Tina 2, calibrate these core slicer parameters:
| Slicer Setting Parameter | Standard PLA Value | Silk / Aesthetic PLA | Technical Engineering Notes |
|---|---|---|---|
| Nozzle Print Temperature | 195?C ? 200?C | 205?C ? 210?C | First layer at 205?C to maximize bed tack, then step down |
| Retraction Distance | 4.5 mm ? 5.5 mm | 5.0 mm | Bowden tube requires longer retracts than direct drive |
| Retraction Speed | 40 mm/s ? 45 mm/s | 40 mm/s | Higher speeds risk grinding filament with stock extruder gear |
| Print Speed | 40 mm/s | 35 mm/s | Outer perimeters at 25 mm/s for superior dimensional fidelity |
| Part Cooling Fan | 100% (after Layer 2) | 100% | Keep fan off for layer 1 to prevent edge curling on unheated bed |
| Initial Layer Height | 0.24 mm (with 0.4 nozzle) | 0.24 mm | Thicker initial layer compensates for bed surface micro-variations |
Common Tina 2 Hotend Defects & How Temperature Fixes Them
- Heat Creep Blockages: If your print fails reliably after 30 to 45 minutes with the extruder clicking and chewing into the filament, heat is creeping past the heatbreak into the cold zone. Reduce your printing temperature by 5?C and ensure the front cold-end cooling fan is spinning at full RPM without dust buildup.
- Pillow Surface Roughness: If top solid surfaces show pillowing or tiny open pockets, the plastic is extruding too hot and sagging into the infill voids before the part cooling fan can solidify it. Add one extra top solid layer and drop the hotend temperature by 5?C.
- Under-Extrusion along Seams: If tiny gaps appear immediately after layer changes, the filament is oozing during retraction travel moves because the melt viscosity is too low. Lowering the temperature restores molten cohesion.
Frequently Asked Questions
Can the Tina 2 print PETG or ABS?
The Tina 2 is not designed for ABS because it lacks an enclosed chamber and a heated bed (ABS will warp severely and detach). PETG can technically be printed at 220?C?225?C with bed adhesives like blue tape or glue stick, but standard PLA or PLA+ remains the recommended material.
Why does my Tina 2 extruder click during the first layer?
Extruder clicking occurs when the nozzle is physically too close to the unheated bed (causing high backpressure) or the nozzle temperature is set too low to melt filament fast enough for the commanded extrusion speed.
Get our latest guides, news, and insights highlighted in your Google Search & AI Overviews.


